Dear timetablers,
The major improvements in this release are listed below:
Manage timetables efficiently
Timetables can be filtered by modified date, tags and published/deleted status. By default, when you click the open icon, only recently modified timetables are displayed. If you have deleted timetables by mistake, you have 30 days left to undelete them.
Stay organized using tags
Filter activities and resources by previously assigned tags. That way, you can create an English teachers meeting or copy constraints to 5th graders without having to select them one by one.
Exclude from generator and statistics
Non-teaching activities like teacher meeting, preparation, duty and lunch shouldn't affect teacher/class load. Use the new options to exclude subjects from the generator/notifications and/or statistics.
Integration with other school software
While importing data you can import custom ids for all resources from SIS/MIS software and these ids will also be used when exporting timetable into a CSV file. Moreover, you can import/merge any property for a resource, which enables quick update of specific constraints for more resources at once.
Resize periods based on duration
By default, all periods appear to have the same size in the view regardless of their actual duration. Check 'Resize periods based on duration' in the options for a more realistic timetable look both in the master and individual views and when printing/publishing a timetable.
Other improvements
- Filter activities/statistics by tags and export all individual statistics at once, include the 'Students' column if needed
- Selecting classes/groups is similar to selecting any other resources, additionally, you can filter resources by tags, make a selection and reorder it using keyboard, also both lists can be enlarged by resizing the selector window
- Import clips along with activities and import any column order
- Unscheduled cards are grouped by subject and sorted descending by length
- Add 'Notes' for all resources
- Copy subject difficulty to others
- Accordion-like expanders are added throughout the app to simplify forms
- Dates are displayed with respect to your browser's settings
- Latest bug fixes
Dear timetablers,
Thanks to your generous feedback there are 400 ideas implemented in online user voice. The major improvements in this release are listed below.
Manage students
Each student has a name, short name and unique groups it belongs to. By adding activities for groups, students belonging to these groups will be assigned to these activities as well. The view can be filtered by a specific student so each student has their own timetable. For instance, here is a timetable for a student named Donna Gordon.
Create your own view
Now you can display only some resources, e.g. 5th graders or English teachers and optionally exclude days and periods. Created views can be used for publishing, exporting, customizing and printing. Watch video on how to manage views.
Match your school's branding
Take a look at United States International and United States examples which are already customized with the most common changes: custom school logo, font/size, colors and styles.
Export to PowerSchool, iSAMS and more
Choose desired format, customize columns and export timetable to a file which can be imported to other software, such as SIS and MIS.
Other improvements
- User guide is completely revised to include 150+ helpful How-to's
- Set any text you want to be displayed inside the cards
- Instead of default periods you can show custom periods in the specific individual views
- Days and periods can be imported or merged
- Import activities using short names (codes)
- Optionally show marks on the published web page
- Freeze the first column when using horizontal zoom
- Help in the menu shows the embedded User guide and introductory videos
- Choose 'Help > About' to view release notes and check whether the app is up-to-date. Here, you can also suggest an idea for improvement or report an issue.
Tags:
release,
students,
export,
views,
powerschool,
isams,
timetable,
schedule,
school,
timetabling,
scheduling,
software
Dear timetablers,
Following our goal to make timetabling easier for anyone, we have created 10+ video tutorials packed with tons of helpful info so you can be more productive with your scheduling tasks. As always, based on your feedback the app is constantly being improved. Listed below you will find the changes related to the latest Prime Timetable release and these are:
Generator works better in modern browsers
Automatic generation has been additionally optimized to give you the best results when working on challenging timetables. Thanks to the latest and ever advancing web technologies automatic generator works equally well in any modern browser: Chrome, Firefox, Safari, Edge or Opera.
GDPR Rights for Data Portability and Erasure
New Privacy Policy clarifies what information we collect and how we use it but there are also some new features. For example, you can now download your personal data archive or delete your school account in a more automated way.
Undo any change using the new History
Explore different timetable solutions and safely revert changes at any time using the new History panel. Customize the number of remembered states in the options. By default, the last 100 states are remembered.
Easier integration with other apps
Timetables are stored in the new 2.0 format and the app consumes new RESTful APIs enabling a much easier integration with other apps. Old timetables can still be imported by choosing Owl > Open > Open from File.
Other improvements
- The term "activity" is now used instead of "lesson". Subjects, teachers, classes/groups and rooms are displayed using full names in the activities grid (switch to short names by clicking "Total" in the statistics above the grid). Similar activities are not longer grouped together which allows organizing activities any way you like.
- Group sets and groups are redesigned to appear more grid-like so you can control the order of group sets and their groups using up and down arrows in the bottom right corner of the grid or copy group sets to other classes using Copy button.
- Collaboration is further improved so the timetablers can simultaneously work on the same resource within a timetable and all saved changes will be seamlessly synced and merged across any device you or your colleagues might be using.
- Custom periods can be reordered by moving them from one default period to another using up and down arrows in the bottom right corner of the grid.
- Merge two timetables will additionally merge custom periods, groups and forbidden, unwanted and mandatory positions.
- Grid sort will immediately refresh the view. Use the new History panel to undo sort.
- Some windows, e.g. manage data or customize cards are non-modal now, so you can drag cards, switch views and similar without having to close them.
- Subject difficulty is set to medium by default.
- Check for the same short name is removed when importing activities.
- When you click the open icon multi-select in the grid is enabled so you can delete more timetables at once.
- Newly added cards have scheduled room(s) if desired room(s) are set.
- Experienced timetablers might want to uncheck "Show tips" option which is checked by default.
- Software is built using the latest web standards and therefore the old plugin app and support for Internet Explorer 9 and 10 has been removed. Although Internet Explorer 11 is still partially supported, consider installing a more modern browser instead.
- Lots of bug fixes, such as pinned unscheduled cards which can now be used in combination with clipped cards without causing any issues.
We hope you will enjoy new improvements and wish you happy scheduling!
It takes only about half an hour to watch 10 free videos packed with tons of helpful info so you can be more productive with your scheduling tasks. Watch getting started videos now and subscribe to our YouTube channel to get the latest video tutorials for free.
Video tutorials: Introduction
Videos are only a couple of minutes long and cover basics as well as some tips & tricks.
Experience state-of-the-art scheduling software, with a blazing fast automatic generator, real-time notifications and extra views, revamped design, efficient managing of lessons/cards, teacher substitute, 10 skins to choose from, share to social networks, export to Excel/Sheets, plus more. A brand new Prime Timetable is a perfect match for schedule challenges, making you more more productive on any device you choose.
Add personal touch to your schedules
Head into Owl > Options and choose your favorite blue, green, red, violet, orange, pink, cyan, brown, gray or dark skin. Additionally, you can choose any color you want for the card background.
Manage lessons efficiently
Adding lessons to classes on the same grade level or same subject teachers can be cumbersome. Instead you can add lessons for only one class and then copy/edit cards for other related classes or leave the desired room empty and assign teachers to their homeroom later to speed up the process.
Easily substitute teachers
Select any number of cards and edit all of them at once to substitute teachers or any other resources.
Share to Facebook, Twitter and Google+
Easily share master or individual schedule to Facebook, Twitter and Google+ by choosing Share > Social Networks. Additionally, choose Share > Embed Timetable to generate necessary Html code to insert the schedule into your school's website or blog.
Export to Excel/Sheets
Once the schedule is finished choose Save as > Html Spreadsheet(s) to export master or individual schedule(s) as a table to Microsoft Excel or Google Sheets in case you need additional tweaks for your schedule.
Tons of improvements based on your generous feedback
- A new set of outline icons looking great on modern devices plus simplified owl
- Read and search user guide without leaving the app
- Importing lessons via Excel/Sheets is improved
- Copy selected cards to another resource
- Thanks to better text wrapping cards display more content on phones
- New option for sharing currently opened individual view
- Redesigned horizontal and vertical zoom
- Specific optimizations for various devices: iPad, iPhone, Android
Add your ideas to online user voice or give us a feedback by sending email. We wish you happy scheduling!
Tags:
release,
timetable,
schedule,
school,
timetabling,
scheduling,
software,
skins,
substitute,
excel,
export,
share
Dear timetablers,
Thank you for incredible feedback you've been sending us. As a result of your generous support, we bring you the ultimate scheduling experience and much more productive timetabling on any device in the newest Prime Timetable.
Blazing fast automatic generation
We have optimized automatic generator specifically for Chrome browser that majority of timetablers are already using and the results are astonishing: generation is now 2 times faster than in the plugin app and at least several times faster than in any other modern browser. We highly recommend you give Chrome a try (if you haven't already) and reward yourself with blazingly fast automatic generation.
Clip cards so they are scheduled together
The most requested feature in our online user voice is here. Clipped cards have a little clip icon in the top left corner and will be scheduled and dragged all together, which is essential for block scheduling.
Easily resolve conflicts by merging cards
Although you may hide error notifications by pinning conflicted/rotated cards, the recommended approach is to merge cards instead, and create one out of two or more cards by combining all classes/groups/students and teachers into one lesson.
Drag multiple cards
In a single move you can drag multiple cards simply by drawing rectangle selection around them using the mouse. In order to select the whole day/period/resource or specific range, use Ctrl/Cmd and/or Shift key. When dragging a selected card, the other(s) will follow. Pretty neat, huh?
Web app is now set as preferred
Web app works on Mac, PC, iPad, iPhone, Android phones and tablets, Chromebooks, Linux and countless other devices. No installation needed. You can set your preference by choosing Help > Options > Preferred App.
Lots of other improvements
- Saving timetable as local file is available without internet connection
- Easily perform bulk actions on selected cards using context menu: pin/unpin, merge/split, clip/unclip, copy/paste to specific day or period, remove and delete.
- Context menu also added for days, periods and resources in the view
- iOS (iPad and iPhone) and Android specific optimizations and improvements
- Help updates: generator tips, generator priority levels and many more...
We hope you will enjoy new improvements and wish you happy scheduling!
Tags:
release,
timetable,
schedule,
generator,
solver,
school,
timetabling,
scheduling,
software,
clip,
merge,
multi-select,
iOS,
iPad,
iPhone,
Android,
Chromebook
All modern browsers are perfectly suitable for everyday use, but when it comes to web apps and especially intensive calculations like automatic timetable generation, they give drastically different results.
Our statistics show that Chrome is by far the most popular browser among Prime Timetable users and therefore we did some extra optimizations for this browser in order to achieve maximum performance. The results are astonishing:
Desktop application performance on the web
It turns out that by using Chrome, the performance of automatic generator is 2-100 times faster than in any other modern browser, fully reaching desktop application performance on the web! If you don't already use Chrome for your timetabling work, we recommend that you give it a try.
The generator will work considerably faster in Chrome than in our plugin app, a couple of times faster than in Firefox and sometimes even 100+ times faster than in Internet Explorer 11.
Use Chrome and enjoy timetabling to the max
When it comes to performance, we have a clear winner: Chrome. The second best is Firefox and then comes Safari. If you are using Internet Explorer, we highly recommend that you avoid using it for any kind of complex school scheduling (although we do have high hopes for Microsoft's new browser called Edge). Please note that all browsers are still supported, even the 14-year-old Internet Explorer 6 via the plugin app. However, if you want the best performance, use Chrome and reward yourself with blazingly fast automatic generation!
Dear timetablers,
Ow(l)ing to your generous feedback and support, we have added tons of timetabling features ready for you to use as of today! New Prime Timetable enables even more timetabling scenarios and performance improvements that you can enjoy on any device you might be using: Mac, PC, tablet or smartphone. No plugins, no installation, it just works! Sounds interesting? Read on.
Automatic generation is 3 times faster than before
By utilizing the power of the latest modern browsers we have been able to drastically improve automatic generation performances. Just click play icon and enjoy automated scheduling at its best. Use Firefox, Chrome or Safari for superior experience. If automatic improvements have no progress after a minute or so, it's time to revise your data or constraints. Feel free to get in touch with our customer support at any time by choosing Help > Contact us.
Get notified upon any timetable change
The newly redesigned notification system will instantly warn you upon any change with updated notification number appearing in the top right corner. Clicking the bell icon will open a current list of all errors and warnings.
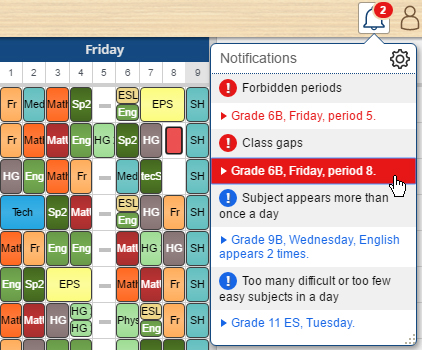
If needed, some notifications can be ignored by pinning related cards.
Subjects can be automatically scheduled more than once per day
If the new option Allow subject to be taught more than once per day is checked, you won't be notified if the subject is scheduled more than once a day.
Maximum number of lessons in a row
When you set desired maximum number of lessons in a row for a teacher, the automatic generator will try to resolve this requirement and a notification will warn you if some of your staff is teaching more than allowed number of consecutive lessons.
Organizing rooms by room capacity, tags and names of buildings
In order to better organize and group rooms, you can now specify room capacity, room tags, e.g. "1st floor, lab", and building name. That way, when adding alternative rooms for the lesson, you can easily select all rooms on the 1st floor or all rooms with specific capacity/tag.
Minimize moves between buildings
After entering building names for rooms, set Allowed daily number of moves between buildings to minimize moves for staff members and let the generator do the magic. Additionally, the software can ignore teacher moves after the window.
Lots of other improvements
- Displaying large timetables is 3 times faster.
- Pinned cards have pin icon in the top right corner.
- Awaiting cards are displayed in several rows in the individual view and when an awaiting card is dragged into the timetable, others are automatically reordered.
- Saving changes while there is no internet connection is supported.
- Better multi-touch support
- Lots of smaller fixes and updates for iPad, iPhone and Android devices.
If you are currently using our plugin app and want to try new features, just select web app by choosing: Help > Options > Preferred App.
Hope you like the new improvements, and don't forget to give us a feedback, send us email or add your ideas to our online user voice. Happy scheduling!
Dear timetablers,
Surprise your students and colleagues with all-new Prime Timetable, reimagined and rebuilt from ground up to work on any device. Beautifully optimized schedules are now just a tap away on your tablets and smartphones. No installation, no setup. It just works. Visit primetimetable.com to create a free account (if you haven't already), log in and enjoy scheduling like never before. Prime Timetable is still the only app in the global market fully accessible both online and offline, and now we have taken a giant leap forward by making it accessible wherever, whenever!
Schedule the whole school on a pocket size phone
Seeing is believing. Therefore, we have made a video showing automatic generation, instant validation, manual adjustments, dragging cards with just a touch of your finger and sharing schedules online. And all this on a pocket size phone! Watch the video.
Teachers and students have direct access to their individual schedules
When you tap/click the class or teacher's name in the master schedule, an individual schedule is opened. Anyone can bookmark that page to the home screen of iPhone/iPad or Android smartphone/tablet, or pin that page to the start menu on Windows Phone, or create a web shortcut on Mac OS X, or just put it in the browser's bookmark/favorites for easier access. Whatever you or your colleagues/students prefer.
No Wi-Fi? No problem. Schedules are available even offline
Once a colleague or a student has visited the published timetable they will be able to see it again any time they want and without internet connection! The master and all individual schedules are accessible offline. Even if you are stuck in the traffic without Wi-Fi, your schedule is always there. Again, no installation, no setup. It just works.
Choose your preferred app: web or plugin
Choose Help > Options > Preferred App and pick the app that best fits you. The web app works everywhere and will be automatically opened if you visit primetimetable.com using tablet or smartphone. The plugin app is available even offline as a desktop app and is up to 3 times faster when it comes to generating complex school schedules.
Two apps at the price of one. Up to 50% discount for multi-year purchase
Both web and plugin apps are available at the price of one. Plus, we offer special discounts (up to 50%) for multi-year purchase. Check plans and pricing and choose the plan that suits your school.
Share your experience with Prime Timetable. Owl we need is love
Your invaluable feedback has helped us enormously to improve the application, and so far we have implemented more than 200 ideas that you have requested. We are truly grateful for your generous support and would like to invite you to share your experience with Prime Timetable and spread the word so that others can get their schedules done and have fun!
Visit our brand new website for more info and enjoy scheduling like never before.
There are two ways to create a two-week timetable using Prime Timetable. One obvious way is to create one timetable and set 10 days. But that is not what you want to do if you need to make a two-week timetable with almost identical lessons. For example, let's assume that 4 days in a week have exactly the same timetable and there are some differences only on Friday. In this scenario we have two types of lessons:
- (A) Lessons that are held the same number of times in both weeks
- (B) Lessons that are held over one week but not the other.
All other variations boil down to these (A) and (B) types. For instance, there could be a lesson occurring 1.5 times per week, which means there are two lessons in the first week and one in the second. In that case one lesson is type (A) and the other (0.5) is type (B).
Here is the procedure of scheduling such two-week timetables using Prime Timetable:
- Create a new timetable with 5 days.
- Add all type (A) lessons using Manage > Activities > Add.
- Forbid Friday using the red marker (just pick the red marker and click on Friday in the timetable view)
- Generate the timetable using play icon.
- Fix all cards using the pin (just pick the pin and click in the top right corner of the timetable)
- Pick the red marker and click once again on Friday to remove the forbidden positions. Click all other days to forbid lessons on Monday, Tuesday, Wednesday and Thursday.
- Save two copies of this timetable: Week 1 and Week 2 using Save As > Copy of Timetable.
- For each timetable add type (B) lessons and generate the timetable again.
Of course, there are many more variations but the procedure is similar.